Your first test
This walkthrough takes you from opening QAlity to running your first test case. If this is your first recording, QAlity will guide installation through the in-app popup when you click Start recording.
Step 1 - Open QAlity and go to Test Cases
-
Sign in to QAlity
Open app.qality.dev and sign in with your email and password.
-
Click Test Cases in the left sidebar
After signing in you will see the sidebar with Test Cases, Test Suites, Test Plans, Advanced, and Settings. Click Test Cases.
-
Click + Create Test Case
In the top right corner click the + Create Test Case button. A new test case will open with the name Untitled Case.

Step 2 - Inside the test case
When the test case opens you will see:
Untitled Case - The name of your test case. Click directly on the 'Untitled Case' text at the top to edit it. Type your name and press Enter to save it. Example: 'Login flow' or 'Checkout test'.
Add a description - Optional field below the name. Add a short note about what this test case covers.
Created By - Shows who created the test case and when it was last run.
Test Steps tab - The main working area. All your recorded or manually added steps appear here.
Execution History tab - Shows all previous runs of this test case with their results and timestamps.
Right panel - Set Priority, Type, Prerequisite, Environment, and Tags for the test case from the Test Case Overview panel on the right.
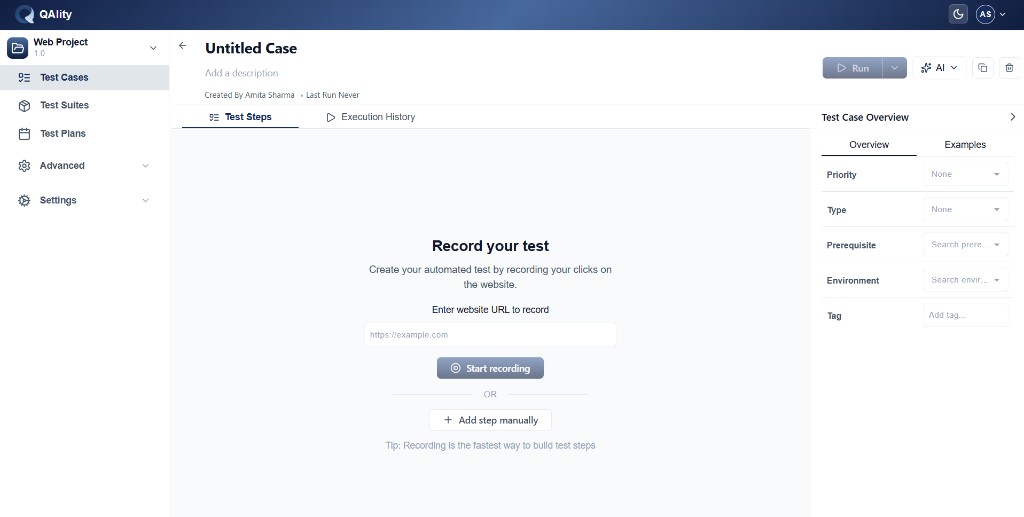
Step 3 - Start recording
In the center of the Test Steps tab you will see two options:
Enter the URL of the website you want to test and click Start recording. QAlity opens the site and captures every click, input, and navigation automatically.
Click + Add step manually to write a step yourself without recording. You can mix recorded and manual steps in the same test case.
If you choose Start recording follow these steps:
-
Enter your website URL
Type the URL into the Enter website URL to record field. Example: https://yourapp.com/login
-
Click Start recording
Click Start recording. QAlity will open your website and begin capturing your actions.
First time setup: A popup appears in QAlity with 2 steps. Step 1 is Install from Chrome Web Store. Step 2 is Open extension settings to enable Allow in Incognito. If the extension is already installed, refresh and the popup moves to Step 2.
-
Perform actions on the page
Use your web app the way a real user would. Click buttons, fill in forms, navigate pages. Every action is saved as a test step.
-
Stop recording
When you are done stop the recording. QAlity returns you to the test case and shows all captured steps.
Step 4 - Review and save
-
Review the captured steps
Look through the steps QAlity recorded. Each step shows the action, the element it interacted with, and any values entered.
-
Rename the test case
Click directly on Untitled Case at the top. It becomes editable - type your test case name and press Enter.
Step 5 - Run your test case
-
Click the Run button
At the top right of the test case click the Run button. A dropdown appears with run options.
-
Choose Browser Execution or Cloud Execution
Select Browser Execution to watch the test run visually in real time. Select Cloud Execution to run it in the background.
-
Check the result
After the run completes the result shows as Passed, Failed, Aborted, or Stopped in the Execution History tab and in the Test Cases list under the Result column. If the test was never run it shows as Not Executed.
The list shows: Name, Updated By (who last edited it), Updated Date, Result (Not Executed / Passed / Failed / Aborted / Stopped), and Actions (delete).